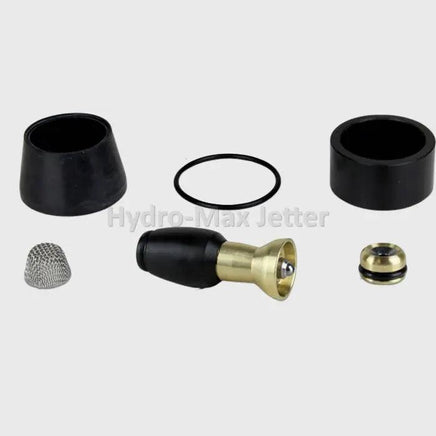
Aqua-Rocket Nozzle Rebuild Kit
If you're in need of repairing your Aqua-Rocket nozzle, you've come to the right place. Before we get started, there are a few things you should know when ordering your repair kit:
- Make sure to order the same size nozzle repair kit as the nozzle you have. You can find the size on the end of the nozzle end cap, which will be laser engraved. For example, if your end cap says "3.0," you'll need to order a 3.0 repair kit.
- It's important to note that the internal parts of the nozzle are not interchangeable, so be sure to order the correct size repair kit.
Now that you know what you'll need, let's go over the tools you'll need to install the repair kit:
- Adjustable wrench
(Must open up to at least 1 1/2") - Small needle nose pliers
- Small Phillips screwdriver
- Small flathead screwdriver
- Channel locks
Now let's go over what you'll find in the repair kit:
- Instruction sheet
- New rubber boot
- New O-ring
- New top insert
- New seat retainer
- New dome screen
- New rotor assembly
Repair Instructions
Now that you have everything you need, let's start the installation process. First, grab your channel locks and remove the end cap of the nozzle by unthreading it. Once the end cap is off, set the nozzle housing aside. Next, use a small flathead screwdriver to pry the dome screen out of the end cap, and use your needle nose pliers to remove it. Discard the old screen.
Next, use a flathead screwdriver to remove the old O-ring from the end cap, and set the end cap aside. Now it's time to remove the internal parts of the nozzle housing. Take out the top insert, rotor, rubber boot, and seat retainer and discard them.
Now that the nozzle is all taken apart, it's time to start reassembling it. First, grab the nozzle housing and the new seat retainer. Make sure that the O-ring on the seat retainer is facing down and the rounded side with the shiny spot is facing up, and then push it into place with your finger. Next, slide the new rubber boot into place, followed by the new top insert, which should have the little lip facing upwards. Drop in the new rotor, with the nozzle side facing down.
Next, grab the end cap and put the new O-ring on it. Then, use a needle nose pliers to push the new dome screen down into the end cap. Finally, hold the nozzle housing at a slight angle and thread the end cap back on, using the channel locks to tighten it down.
And that's it! Your Aqua-Rocket nozzle is now repaired and ready to use. If you have any further questions about how to install the repair kit, please don't hesitate to reach out to us.
