Your cart is currently empty.
Skip to product information
Please note that the 1/4 " Repair Kit does not include a top insert and the included boot is made of plastic.
Additionally, the included rotor assembly may appear slightly different than the original.


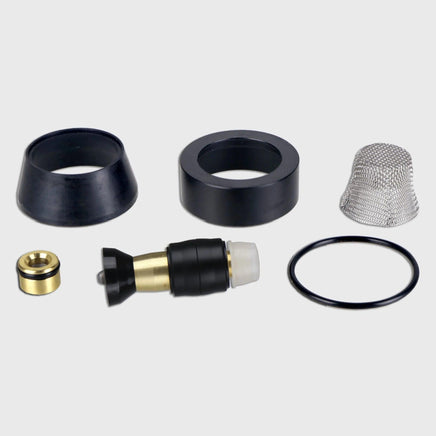
The Reaper Front Rotor Repair Kit includes the following components:
- Rubber Boot
- Inlet Screen
- Seat Retainer
- Rotor Assembly
- O-Ring
To install the kit, follow these instructions:
- Start by unscrewing the end cap on the nozzle and removing the existing components (top insert, boot, rotor, and seat).
- Next, you'll need to remove the O-ring on the end cap and replace it with the new one included in the kit.
- Then, install the new seat as shown (with the O-ring side down) and press it into place.
- Push the new boot into the grooves inside the housing.
- Insert the new top insert, ensuring that the lip (smaller ID) is closest to the end cap.
- Position the new rotor on the seat inside the housing, ensuring that it is oriented correctly with the tip down. The rotor will lay against the side of the nozzle.
- Screw on the end cap with the rotor laying against the side of the nozzle and tighten it.
- Examine the inlet of the end cap to ensure that there is no debris caught in the screen. If there is debris, remove the screen and clean or replace it.